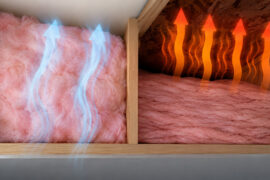
Air carries almost all of the moisture that ends up inside a wall cavity. Diffusion through solid material handles what’s left, and what’s left is small. Air movement accounts for more than 98 percent of all water vapor movement through building cavities, according to the U.S. Department of Energy (2024).
Worth sitting with that number before anyone staples plastic to a stud bay.
Contractors and code officials still put vapor barriers inside frame walls, crawl spaces, attics, and slab foundations. Which product goes where depends on the climate zone and on the direction moisture tends to travel in that climate.
What Is a Vapor Barrier?

Strip away the job-site arguments and the function is narrow. Certain building materials restrict how fast water vapor diffuses through a wall, floor, ceiling, or slab assembly, and the ones that restrict it enough get called vapor barriers.
Moisture moving as vapor. Not liquid water.
That distinction matters more than most homeowners realize. A vapor barrier is not automatically an air barrier, and it is not a water-resistive barrier either, even though all three get lumped together on site.
Codes mostly avoid the phrase. They say vapor retarder, and the gap between the two words comes down to how strict the perm rating has to be.
It sits inside a broader home insulation system, working alongside batts, boards, or foam so heat and moisture get handled together.
On its own it adds no R-value. It does nothing about air moving through gaps and cracks, and it won’t stop bulk water either. And “vapor retarder” isn’t always a clean drop-in synonym in a given code document, even though both words describe the same function in practice.
What Is the Difference Between a Vapor Barrier, an Air Barrier, and a Water-Resistive Barrier?
Three different jobs, often sold in the same aisle. Vapor diffusion is what a vapor barrier slows. Bulk air movement belongs to the air barrier. A water-resistive barrier sheds liquid water off the back of the cladding while still letting vapor pass through.
One product can cover one of those jobs, two, or all three, depending on how it is built and tested.
| Component | Stops | Common Material | Typical Location |
|---|---|---|---|
| Vapor barrier | Water vapor diffusion | Polyethylene sheeting, foil facing | Warm side of insulation |
| Air barrier | Bulk air movement | Taped sheathing, spray foam | Anywhere in the assembly |
| Water-resistive barrier | Bulk liquid water | Housewrap, building paper | Behind exterior cladding |
Vapor Barrier vs Air Barrier
These two get confused constantly, mostly because both sound like sealing.
Retrofit air sealing work closes the same gaps an air barrier blocks, but with foam, caulk, and gaskets instead of a continuous membrane.
An air barrier stops bulk air movement and can be vapor-open or vapor-tight, whichever the assembly calls for. A vapor barrier stops diffusion and says nothing at all about air leakage.
The two jobs don’t overlap by default. A house can blower-door test tight and still grow a soggy wall cavity if nobody addressed vapor separately.
Vapor Barrier vs Water-Resistive Barrier (Housewrap)
DuPont’s Tyvek HomeWrap is the product homeowners confuse with a vapor barrier most often, and the mix-up causes real installation mistakes, so it’s worth naming.
Contractors get asked constantly if Tyvek qualifies as a vapor barrier. One number settles it.
Tyvek HomeWrap carries a perm rating of 56, according to Today’s Homeowner (2024). The ceiling for a Class II vapor retarder is 1.0 perm.
That high permeance is the entire point. Housewrap is supposed to breathe: shed rain on the way in, let trapped vapor escape outward.
Housewrap blocks bulk water and not vapor. A vapor barrier blocks vapor and may do nothing for bulk water. Asking one to do the other’s job is a standard framing-stage error.
What Are the Classes of Vapor Retarders and Their Perm Ratings?

Classification runs on a single measured number: how much water vapor passes through a material per hour. That’s the perm rating, and it comes out of a lab test called ASTM E96.
The dry-cup version holds 0 percent humidity on one side of the sample and 50 percent on the other, then measures what crosses over.
Where a material lands on that scale puts it in Class I, Class II, or Class III, based on ASTM E96 lab testing summarized by Johns Manville (2024):
- Class I sits at 0.1 perm or less. Polyethylene sheeting and foil facing live here.
- Class II covers 0.1 to 1.0 perm, which is where kraft-faced batts land, along with most closed-cell spray foam at 1.5 to 2 inches.
- Class III runs 1.0 to 10 perm. Standard latex-painted drywall counts.
Spec sheets cite either Procedure A (dry cup) or Procedure B (wet cup) of ASTM E96. Wet cup tends to report higher permeance for the same material, so it’s worth checking which one produced the number you’re reading.
Under-slab sheeting answers to a different standard, ASTM E1745, with its own thickness and puncture-resistance requirements rather than the perm classes alone.
The IRC keeps its wording shorter than the ASTM classes. Material with a perm rating of 1 or less, per W. R. Meadows (2023).
How Does a Vapor Barrier Control Moisture Movement and Condensation?

Drop a low-permeance layer into the path vapor would otherwise take, and the moisture slows down. That’s the mechanism.
Vapor moves from higher vapor pressure toward lower pressure, a process called vapor drive.
Winter usually pushes moisture from the heated interior outward, toward colder and drier air. Summer can reverse it, and in hot humid climates it stays reversed for months.
Heat flow runs on a completely different mechanism, covered in how insulation works. Vapor runs on this pressure-driven diffusion.
Condensation happens when moist air reaches a surface at or below its dew point, the temperature where air can no longer hold all its water as gas.
Inside a wall assembly, the usual condensing surfaces are the back of the drywall and cold window glass, though wood sheathing is the one that rots. All of it part of the same thermal envelope the barrier exists to protect.
Placed correctly, the barrier keeps that surface dry by stopping vapor short of the cold zone. Placed on the wrong side, it holds the same moisture in.
Which Material Should Be Used as a Vapor Barrier?
Polyethylene sheeting, kraft-faced or foil-faced insulation, closed-cell spray foam, smart vapor retarders, vapor barrier paint. That covers nearly every residential application, and choosing among them comes down to the assembly type, the climate zone, and whether the wall is open or already finished.
| Material | Perm Class | Typical Application | Relative Cost |
|---|---|---|---|
| Polyethylene sheeting | Class I | Crawl spaces, under slabs | Low |
| Kraft-faced batt insulation | Class II | Framed walls, ceilings | Low to moderate |
| Closed-cell spray foam | Class II at 1.5 to 2 inches | Walls, rooflines, crawl spaces | High |
| Smart vapor retarder | Variable, Class I to Class II | Cold-climate walls needing inward drying | Moderate to high |
| Vapor barrier paint | Class II to Class III | Interior retrofits, no demolition | Low |
Polyethylene Sheeting
Six-mil poly has been the default for crawl space floors and under-slab work for decades, and nothing has really displaced it.
Cheapest option per square foot, stocked at any lumberyard. It also tears if you breathe on it, and every seam needs taping or it barely matters that you installed it.
True Class I material, which is exactly what a crawl space floor needs when it’s sitting against bare soil.
Kraft-Faced and Foil-Faced Insulation
Plenty of framed walls across North America already have this in them, whether the homeowner knows it or not.
Kraft paper bonded to fiberglass batt insulation is the common version. Foil-faced polyisocyanurate board is the rigid-board equivalent.
Owens Corning is one of the largest manufacturers of kraft-faced batts sold at retail. Both facings count as Class II under the standard classification.
The install detail matters more than the material choice. In most climates the facing goes toward the interior, warm side of the wall, not the exterior, and discovering it backwards after the drywall is up makes for a bad afternoon.
Closed-Cell Spray Foam
Insulation and vapor control in one application, once it hits the right thickness.
At 1.5 to 2 inches, closed-cell spray foam insulation drops below a 1.0 perm rating and qualifies as a Class II vapor retarder on its own, according to Huntsman Building Solutions’ 2022 design guide on spray foam vapor retarders.
That one fact changes how the assembly gets designed, because insulation and retarder become a single continuous layer. No separate membrane, no seams, no staples.
It costs more than sheet goods and needs a trained crew with a rig, not one person and a staple gun.
Smart Vapor Retarders
Not a fixed material at all.
Its permeance shifts with the humidity around it, tightening up in dry winter air and opening when summer humidity climbs.
CertainTeed’s MemBrain is the one that turns up most in code-compliant projects using this category.
At low humidity it acts like a Class I material. At high humidity it slides closer to Class III, which lets the wall dry inward during warm months instead of holding moisture against the sheathing.
Vapor Barrier Paint
A primer formulated with a low-perm resin, rolled on like ordinary interior paint but tested against a specific perm ceiling.
It earns its place on a finished wall where opening up the drywall isn’t an option and the code only asks for Class II or III.
It will not fix a wall that already has a moisture problem behind the drywall. All it does is slow new vapor from getting in.
Where Should a Vapor Barrier Be Placed Within a Wall, Floor, or Ceiling Assembly?
Climate decides it. For cold climates the rule is short: install on the side of the insulation that faces the heated interior.
Crawl spaces, basement walls, attics, and slabs each follow their own logic from there.
Crawl Spaces
The barrier goes across the ground here, not up the walls, because soil moisture is what feeds mold growth and wood rot in the framing overhead.
- Minimum 6-mil polyethylene, run up the foundation wall about 6 inches
- Seams overlapped and taped, not just laid edge to edge
- Fastened along the perimeter so it stops shifting every time someone crawls through
CleanSpace, a crawl space encapsulation system from Basement Systems, uses a heavier 20-mil liner wrapped around piers and mechanically fastened to the foundation for exactly this reason.
Basement Walls
Order of operations matters here more than almost anywhere else in the house.
When insulating basement walls, the vapor retarder normally goes against the concrete before the framing and batts, not on the finished interior face.
Concrete, then retarder, then framing, batts, drywall. Flip the retarder to the room side and moisture gets stuck between the concrete and the back of the drywall, which is the one outcome the wall was supposed to avoid.
Attics
Vent status settles this, and the two answers aren’t close to each other.
| Attic Type | Vapor Barrier Location |
|---|---|
| Vented attic | Ceiling plane, beneath the top-floor drywall |
| Unvented, conditioned attic | Usually none separate; closed-cell spray foam at the roof deck instead |
The goal doesn’t change either way. Keep household moisture away from a cold surface before it gets a chance to condense.
Under a Concrete Slab
Sheeting under a slab has to meet ASTM E1745, a standard written specifically for vapor retarders in this location.
Stego Wrap is one of the more widely specified products built to it, picked on slab-on-grade jobs across the country for its puncture resistance.
- Placed directly under the slab, before the pour
- Seams taped per manufacturer instructions, not with whatever tape is in the truck
- Punctures patched on the spot, since nobody is repairing a torn barrier once the concrete cures
Does Building Code Require a Vapor Barrier?

Yes across most of the country, though the requirement tracks climate zone instead of applying the same way everywhere.
IRC Section R702.7 requires a Class I or Class II vapor retarder on the interior side of frame walls in Climate Zones 5, 6, 7, and 8, plus Marine 4, according to Huntsman Building Solutions’ 2022 summary of that code section and IBC Section 1404.3.1.
The same language runs the opposite direction in warm zones. Class I and Class II retarders are excluded from the interior side of frame walls in Zones 1 and 2, because vapor drive there tends to run inward rather than outward.
The code lists its own exceptions regardless of zone: basement walls, below-grade portions of any wall, and construction where moisture or freezing won’t damage the materials.
Local jurisdictions amend this constantly. Denver’s building department, for one, has proposed its own modifications to R702.7 covering how Class III retarders apply in dry Climate Zone 5.
Whatever edition the local authority adopted beats the model text. Worth one phone call before assuming a national number applies to a specific address.
How Do You Install a Vapor Barrier?

Installation order and seam technique decide whether the barrier performs. More than the material choice does.
The full how to install vapor barrier walkthrough goes deeper on each stage. The short version for a typical wall or crawl space:
- Match the required Class I, II, or III rating to the climate zone and assembly type before buying anything.
- Clean and dry the substrate. Debris or moisture trapped under the sheet defeats the purpose from day one.
- Lay the polyethylene horizontally across studs or joists, working from the top down so each course overlaps the one below.
- Tape every seam with a compatible sealant rather than general-purpose tape.
- Staple or fasten only where the manufacturer permits it. Extra punctures undo a continuous membrane.
Code generally sets the seam overlap at a 6 inch minimum. Installing a vapor barrier in a crawl space calls for a full 12 inches using a reverse-shingle lap, according to the Department of Energy’s 2024 job aid for crawl space ground covers.
Six inches passes inspection. Twelve inches is still doing its job in ten years, after foot traffic and soil settling. That gap between code minimum and field-durable shows up all over this work.
Tape choice matters more than most installers assume. Canadian Technical Tape’s Tuck Tape carries a specific Canadian code certification, CCMC 14018-R, for sealing interior poly vapor barriers. Duct tape holds no such rating.
Duct tape is the most common mistake anyway. Its adhesive was designed for short-term repairs, not thirty years pressed against plastic sheeting.
After that, the frequent one is a vapor barrier on both faces of the same wall. Two low-permeance layers, one cavity between them, no path out for anything that gets in.
When Does a Vapor Barrier Not Apply, and What Happens When It Fails?
Put it on the wrong side of a wall in the wrong climate and it stops protecting anything. It becomes the trap.
Nearly every documented failure traces back to an interior vapor barrier in a climate that runs air conditioning hard, or to two vapor barriers in one assembly.
Climates Where an Interior Vapor Barrier Is Not Recommended
Hot, humid climates flip the vapor drive that a cold-climate interior barrier was designed around.
Building Science Corporation’s own technical guidance links interior polyethylene vapor barriers in air-conditioned assemblies directly to moldy buildings, citing Lstiburek’s 2002 investigation work.
| Climate Type | Interior Vapor Barrier | Why |
|---|---|---|
| Cold, heated climates | Recommended | Vapor drives outward most of the year |
| Hot, humid, air-conditioned climates | Not recommended | Vapor drives inward, condenses on the cold interior poly |
Vancouver’s building stock from the late 1980s and 1990s is the clearest documented case of this exact failure.
Interior polyethylene sheeting kept rain-soaked stucco walls from drying inward. The province’s Homeowner Protection Office has traced roughly $4 billion in damage across more than 900 buildings to the underlying moisture failures.
One building at 3380 Vanness Avenue in Vancouver was still carrying an unsafe order as recently as 2019, decades after the construction decisions that caused it.
Signs of a Failed or Trapped-Moisture Vapor Barrier
Mold can begin growing within 24 to 48 hours once moisture is trapped against a surface, according to the EPA. That short window is why a failed vapor barrier turns into a mold problem faster than homeowners expect.
- Peeling paint or bubbling drywall near the base of a wall
- A musty smell that ventilation doesn’t clear
- Mold visible on framing members once the drywall comes down
- Drywall gone soft, discolored, or crumbling right where the vapor barrier sits
A double vapor barrier, one layer on each face of the same wall, produces the same signs in any climate, cold or hot.
Seal both sides and trapped moisture has nowhere to go, so it condenses inside the cavity instead of drying toward the interior or the exterior.
FAQ on What Is Vapor Barrier
What Tools Are Needed to Install a Vapor Barrier?
A staple gun or cap nailer, a utility knife, compatible seam tape or acoustical sealant, and a tape measure cover most jobs. Crawl space work adds a headlamp and knee pads. Spray foam installation needs professional equipment instead.
How Much Does a Vapor Barrier Cost Per Square Foot?
Basic 6-mil crawl space installation runs $1.35 to $2.00 per square foot including materials and labor, per contractor data compiled by HomeAdvisor (2024). Wall applications during framing cost less, since the material rides along with insulation labor already underway.
Can a Vapor Barrier Be Added Over Existing Insulation?
Adding one on top of an existing barrier usually creates a double vapor barrier, trapping moisture with no path to dry. Vapor barrier paint is the standard retrofit fix when the wall stays closed.
How Long Does a Vapor Barrier Last?
A Canada Mortgage and Housing Corporation survey found most polyethylene vapor barrier installations still performing after 15 years of service. Manufacturer specifications for newer film formulations rate service life at 30 to 50 years, well past a typical renovation cycle.
What to Get Right First With a Vapor Barrier
Class and perm rating matched to the climate zone comes first, because that choice decides whether anything after it matters.
Placement on the correct side of the insulation follows. Then the seam and fastening work that keeps the membrane continuous.
Skip the first and the other two are irrelevant. A Class I retarder installed perfectly in the wrong climate traps moisture just the same as a wrong-class retarder in the right spot.
Choosing Class I over a variable-permeance product also gives up inward drying during warm months, a trade worth accepting only where cooling-season vapor drive stays weak.
Anyone after both functions in one product ends up looking at vapor barrier insulation, the batt and board options with the retarder built into the material itself.