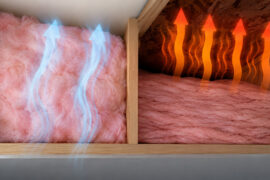
Walls built before the 1970s often have nothing in them. Air, some dust, maybe an old wasp nest. Drill-and-fill insulation is the repair that skips demolition: small holes get drilled into each stud bay, material gets blown in through them, and the holes get patched. Siding stays on. Drywall stays up.
Contractors can work from either face of the wall, moving bay by bay until every cavity is packed to full density.
Density is the measurement that matters, not whether the cavity looks full from the hole. The U.S. Department of Energy’s Building America Solution Center specifies a minimum 80 inches of water column of static pressure at the blower to reach that density, a threshold most attic-grade machines cannot meet.
What Is Drill-and-Fill Insulation

The material itself is nothing unusual. Cellulose, fiberglass and foam all get used in open walls too. What sets this method apart is the access route, a pattern of drilled holes instead of a stripped wall.
It sits inside the broader family of retrofit insulation work, meaning it targets homes that already exist rather than new builds going up stud by stud. Most jobs run through an insulation contractor rather than a general remodeler, since the drilling pattern and fill density matter more here than in open-frame work.
What Drill-and-Fill Insulation Is Not
This is not the job where siding or drywall comes off so the wall can be insulated from scratch. It is also not spray foam sprayed into an open, exposed cavity during a gut renovation, and it has nothing to do with the attic-only blow-in work that gets quoted alongside it.
In some regions, particularly the UK, the closest equivalent gets marketed under the name cavity wall insulation, though the wall assemblies and access methods differ between the two markets. That name overlap matters if a search turns up results written for a different country’s building stock.
How Does Drill-and-Fill Insulation Work

A crew locates the stud bays behind a wall’s exterior or interior face, drills one hole per bay, and blows loose material into the empty cavity with a hopper-fed machine until it reaches full density.
The technique is often called dense pack insulation once the material is packed tightly enough to resist settling and slow air movement through the cavity. That density is the entire point. A loosely blown cavity looks finished but performs closer to an empty one within a few years.
- Locate and mark each stud bay along the target wall.
- Drill an access hole, typically around 2 inches across, near the base of each bay.
- Insert the blower hose and fill the cavity from the bottom up.
- Watch for the backpressure that signals a full cavity, then move to the next bay.
- Patch and finish every access hole once the wall is complete.
Great Northern Insulation, an Ontario contractor, runs this process from either the interior or exterior face of a home, choosing whichever side gives easier access to the studs. That flexibility is one reason the method works on both older interior plaster and newer exterior siding.
Tools and Equipment Used in the Process
The machine does most of the work. It has to be a hopper-fed blower rated for dense-pack pressure, not one of the lighter attic-blow units that rental counters hand out. Beyond that, a crew needs a flexible hose with a reducer nozzle sized to the drilled hole, and something to confirm bay boundaries before drilling, usually a stud finder or a wire probe.
Dense packing also produces a side benefit worth naming on its own. It tightens up air sealing at the cavity level, since a fully packed bay resists the air movement that a loosely filled one allows.
How the Access Holes Are Patched
Once a bay is full, the installer plugs the hole with a wood or foam insert, then matches the exterior finish, whether that means a siding shingle swap or a drywall patch and paint.
A standard single-family home runs one to two days from first hole to final patch, depending on wall area and how many bays sit behind obstructions.
What Materials Are Used in Drill-and-Fill Insulation
Cellulose covers most jobs. Fiberglass takes some of the rest, and injection foam handles the cases where neither loose fill is the right answer. All of it goes in through the same drilled access points.
Cellulose and fiberglass both fall under the wider category of types of insulation materials sold as loose fill rather than pre-cut panels, which is exactly why they conform to an irregular, already-closed cavity in the first place.
| Material | R-value per inch | Moisture behavior | Best fit |
|---|---|---|---|
| Cellulose | R-3.2 to R-3.5 | Tolerates light moisture, degrades if soaked | Default choice for most wall retrofits |
| Fiberglass | R-4.2 | Not damaged by moisture exposure | Cavities prone to occasional dampness |
| Injection foam | Higher than either loose fill, varies by product | Fully seals the cavity, no settling over time | Cavities that also need an added air barrier |
Those cellulose and fiberglass figures come from the U.S. Department of Energy’s Building America Solution Center, which also notes that cellulose is the material used most often in DOE-funded weatherization work. Fiberglass carries a higher rating per inch, but a lower share of it is made from recycled content compared to cellulose.
Choosing between the two loose-fill options and a foam product usually comes down to moisture exposure and budget, a trade-off covered in more depth in the spray foam or cellulose insulation comparison. Most contractors default to dense-pack cellulose unless a specific moisture or air-sealing concern points toward foam.
What R-Value Does Drill-and-Fill Insulation Add to a Wall

Dense-pack cellulose typically brings a standard 2×4 wall cavity from close to zero up to roughly R-11 to R-13, depending on installed density and how full the bay ends up.
R-value measures a material’s resistance to heat flow. It is worth separating the number for the cavity itself from the number for the whole wall assembly once framing is factored in.
- An empty or barely insulated 2×4 cavity sits somewhere around R-0 to R-4
- Dense-pack cellulose brings that to roughly R-11 to R-13
- Dense-pack fiberglass lands a little higher, at roughly R-15
The gap between those cavity numbers and the wall’s real performance comes down to thermal bridging through the studs themselves, which conduct heat far faster than the insulation sitting between them. The 2021 International Energy Conservation Code sets a prescriptive wood-frame wall requirement that runs from R-13 in the mildest climate zones up to R-30, or equivalent combinations such as R-20 plus continuous insulation, in the coldest ones. A dense-pack retrofit alone does not always close that gap without added exterior insulation.
Which Homes and Wall Types Are a Good Fit for Drill-and-Fill Insulation

Homes with closed, framed wall cavities and no existing insulation are the strongest candidates, which in practice means most houses built before the 1970s and 1980s energy codes took hold.
Balloon-framed walls and platform-framed walls both accept the process, though balloon framing sometimes needs fire-blocking checked first since the stud bays can run continuously from foundation to roofline.
- Platform-framed wood walls with standard stud bays
- Balloon-framed walls, with a fire-blocking check first
- Brick veneer over a wood-framed back wall
- Homes with knob-and-tube wiring, only after an electrical inspection
Wall cavities are the target here, not open below-grade spaces. Basements follow a different insulation approach entirely, one worth reading up on separately through a guide to insulating basement walls rather than assuming the drilled-hole method carries over.
Signs a Home Is a Candidate for the Retrofit
The symptoms tend to show up before anyone thinks about the walls.
- Exterior walls that feel noticeably cold to the touch in winter
- Heating or cooling bills that run high relative to square footage
- Uneven room temperatures on the same floor
- An HVAC system that seems to run constantly without keeping up
Green Communities Canada documented a 127-year-old brick home in Walters Falls, Ontario, where a crew drilled through the brick and dense-packed cellulose into walls that had zero insulation behind the lath and plaster. Annual energy use dropped from 217 gigajoules to 84 gigajoules, a 61 percent reduction, and the project started with an energy advisor running a blower door test to confirm just how leaky the house really was.
How Much Does Drill-and-Fill Insulation Cost
Most homeowners land somewhere between a low four-figure bill and a bit over six thousand dollars, depending on wall area, material, and how much of the wall is actually reachable.
Angi puts the work at $1 to $4 per square foot, with a typical whole-project range of $1,150 to $6,000. For households going through the federal weatherization program, spending per home is capped at a $6,500 baseline that gets adjusted yearly for inflation (10 CFR 440.18, U.S. Department of Energy).
That per-square-foot figure moves around a lot depending on region and access, and a contractor’s quote will usually break out material and labor separately rather than quoting a flat cost per square foot for insulation the way an online calculator does.
- More square footage means more holes, more material, more labor hours
- Masonry veneer and multiple stories add drilling time
- Foam runs above loose-fill cellulose or fiberglass on price
Low-income households can sometimes offset part of that bill through a weatherization rebate program tied to the federal cap above, though eligibility and funding availability vary by state and by year.
How Does Drill-and-Fill Insulation Compare to Other Insulation Methods

Drill-and-fill wins on disruption and cost when the wall is already finished. It also gives up some of what a fully opened wall makes possible.
Removing drywall or siding entirely for a full wall insulation job costs more and takes longer. What that buys is access: rewiring, air sealing at every stud bay, and a look at hidden rot or old insulation that drill-and-fill simply cannot see or fix.
Attic-only blow-in insulation solves a different problem. It addresses heat loss through the roof plane but leaves wall-driven losses untouched, which matters in older homes where the walls, not the attic, are the weak point. Batt insulation is only an option when the wall is already open for some other reason, since batts have to be cut and fitted by hand into a visible cavity.
This Old House general contractor Tom Silva has demonstrated the drilled-hole retrofit on camera, and it is usually paired with separate attic work rather than treated as a stand-in for it.
The upside is easy enough to state. The wall never comes apart, the cost sits well below a removal and rebuild, and most homes are finished inside a day or two.
The downside list is longer:
- No access to rewiring or hidden damage behind the wall
- No way to verify fill quality visually once the hole is patched
- The job gets skipped entirely if existing insulation already fills the cavity
Whichever method a homeowner picks, the underlying case for doing the work holds steady across all of them, since the general benefits of home insulation (lower bills, steadier indoor temperatures, less strain on the HVAC system) apply whether the material went in through a drilled hole or an open stud bay.
How Do You Choose a Drill-and-Fill Insulation Contractor

Look for a contractor holding a recognized building-performance certification, not just a general contracting license. Density and technique separate a good drill-and-fill job from a bad one, and a credential is the closest thing to proof of that skill.
The Building Performance Institute reported 6,441 new certifications earned in 2024, bringing its total active count to 18,144, according to BPI’s own 2024 Annual Impact Report. That is a real, measurable credential system behind the certification, not a badge handed out for showing up.
| Credential | Issuing body | What it verifies |
|---|---|---|
| Building Analyst | Building Performance Institute | Whole-house diagnostic and insulation work |
| HERS Rater | RESNET | Energy rating and post-installation verification |
| Insulation certification | Insulation Contractors Association of America | Installation technique and trade standards |
Katie Consales of CMC Energy, a BPI-certified firm, has pointed to the credential as the line between verified quality and an unverifiable claim in a crowded contractor market. That is the same reasoning worth applying to any drill-and-fill quote.
A contractor worth hiring will usually start with a proper home energy audit rather than jumping straight to a quote, since the audit is what confirms whether the walls are the real problem.
Before signing anything, find out whether the quote separates material from labor instead of giving one lump number, what the warranty actually covers and for how many years, and whether the crew checks for existing insulation before drilling rather than after.
Once the job is finished, a thermal imaging camera can confirm the cavities filled evenly, since a patched hole hides whatever is behind it either way.
RESNET’s own reporting shows the home energy rating field is not a niche activity anymore. The organization passed 4.4 million homes rated under its HERS Index in 2024, a scale that gives homeowners a real pool of trained raters to call on for that kind of verification.
When Does Drill-and-Fill Insulation Not Work
The method fails or gets refused outright in a handful of specific situations. None of them are rare edge cases.
- Basements and garage ceilings with living space above, ruled out on moisture grounds
- A cavity that already holds insulation, which most contractors will not blow over
- A stud bay blocked by fire blocking, diagonal bracing, or a dense run of wiring
That last point is not occasional. The International Residential Code, Section R302.11, requires fire blocking in concealed stud cavities at intervals no greater than 10 feet, which means a crew working on a tall wall will hit a solid obstruction partway up more often than not.
Energy Trust of Oregon’s own guidance to homeowners flags removing existing insulation as a common bid exclusion, not something a standard quote automatically covers. If a wall already has something in it, expect a separate conversation and a separate price before any drilling starts.
Older walls raise a different problem before drilling even begins. What looks like cellulose from a peek through an old access point is sometimes a different, worm-like pebble material, and telling the two apart matters enough to warrant a proper look at how to distinguish cellulose and asbestos insulation before anyone starts drilling.
The concern is not theoretical. A mine near Libby, Montana supplied over 70 percent of the vermiculite sold in the United States from 1919 to 1990, and the Environmental Protection Agency has confirmed that source carried a natural asbestos deposit running through it.
Settling is a second failure path, separate from the under-packing risk of a rushed job. Even a correctly dense-packed cavity can shift a little over years of seasonal humidity swings, leaving a small gap near the top of the bay rather than a fully empty wall.
That kind of gradual settling is what a insulation settlement check is meant to catch, usually years after the original job, not during it.
If any of these conditions apply, the right move is to say so before the first hole goes in the wall, not after.
FAQ on What Is Drill-And-Fill Insulation
What Else Is Drill-and-Fill Insulation Called
Trade names vary by contractor and region. Blown-in wall insulation is the most common one, followed by dense-pack retrofit or just a wall fill job. The drilled-hole access method stays the same everywhere.
Can Drill-and-Fill Insulation Be Done as a DIY Project
Renting a blower to fill an open attic is a common DIY task. Drilling into finished walls and hitting proper dense-pack density is not. Most contractors advise against a DIY wall retrofit, since underfilled cavities settle and lose R-value fast.
Does Drilling Into Walls Permanently Damage Siding or Drywall
No, when the job is done correctly. A contractor patches each hole with a matching plug, shingle swap, or drywall patch and paint. The wall shows a faint seam at most, rarely visible once finish work is done.
How Soon Do Energy Savings Show Up After Installation
Lower bills usually appear the first full heating or cooling season after the retrofit. The exact timeline lines up with a home’s payback period for insulation, which depends on climate, energy prices, and how leaky the walls were beforehand.
What Should You Confirm First in What Is Drill-And-Fill Insulation?
Confirming what already fills the wall cavity comes first in any drill-and-fill insulation project, since the technique only makes sense on a cavity that is empty, fully accessible, and free of hazardous legacy fill like vermiculite.
A short sequence keeps the project on track from there. Find out what is already in the cavity, what framing sits behind the wall, and what each quote charges per square foot.
Choosing this route also means accepting a real limitation. Dense-pack material cannot wrap fully around obstructions like electrical boxes or plumbing stacks inside the cavity, leaving small gaps that a fully opened wall avoids entirely.
The natural next step is matching that same retrofit logic to the attic, where the attic insulation types in common use follow a different set of access rules entirely.