
Summarize this article with:
A poorly insulated attic can waste 25% or more of your heating and cooling energy. That is money leaving through your ceiling every single month.
Learning how to install insulation in attic spaces is one of the highest-return home improvement projects you can take on. The Department of Energy ranks it above window replacement, above new siding, above most upgrades homeowners consider first.
This guide covers the full process, from choosing the right insulation type and R-value for your climate zone to sealing air leaks, laying fiberglass batts, blowing in cellulose, and handling tricky spots like recessed lights and ductwork. Step by step, with the specific tools, materials, and safety precautions you actually need.
What Is Attic Insulation

Attic insulation is a thermal barrier installed in the attic space of a building to reduce heat transfer between the living area and the roof structure. It works by trapping air within its fibers or cells, slowing thermal conductivity and keeping conditioned air where it belongs.
The U.S. Department of Energy estimates that a properly insulated attic can cut heating and cooling costs by 10% to 50%. That is not a small number.
Without adequate attic insulation, warm air rises through the ceiling in winter and hot air pushes down into living spaces in summer. Your HVAC system works harder. Your energy bills climb. And your comfort drops.
Understanding how insulation works at a basic level helps you pick the right material, the right thickness, and the right installation method for your attic.
What Types of Insulation Are Used in Attics
Several attic insulation types are available, each with different R-values per inch, costs, and installation methods.
Fiberglass insulation comes in batts or loose-fill form and offers R-2.9 to R-3.8 per inch. It is the most common choice for DIY attic projects because of its low cost and availability at Home Depot and Lowe’s.
Cellulose insulation is a blown-in material made from recycled paper treated with borate fire retardant. It delivers R-3.2 to R-3.8 per inch and fills gaps better than batts.
Spray foam insulation seals and insulates at the same time. Open-cell spray foam provides R-3.5 to R-3.6 per inch. Closed-cell insulation hits R-6 to R-7 per inch and doubles as a moisture barrier.
Rock wool insulation (mineral wool) offers R-3.3 per inch with better fire resistance than fiberglass. Brands like Rockwool and Knauf Insulation produce batts sized for standard joist spacing.
Reflective insulation and radiant barriers work differently. Instead of slowing conduction, they reflect radiant heat away from the attic floor. Best for hot climates, zones 1 through 3.
What R-Value Does Attic Insulation Require
The R-value your attic needs depends on your climate zone. The International Energy Conservation Code (IECC) and the Department of Energy both publish requirements by region.
Here is a breakdown by zone:
- Zones 1-3 (Southern states like Florida, Texas, Arizona): R-30 to R-49
- Zone 4 (Mid-Atlantic, parts of the Pacific Northwest): R-38 to R-60
- Zones 5-8 (Northern states, Great Lakes, New England): R-49 to R-60
Most homes built before 1980 have R-11 to R-19 in the attic. That is well below current code in every climate zone.
Hitting the right R-value is not about buying the most expensive material. It is about matching insulation depth and type to your specific zone. A home in Minneapolis needs a very different setup than one in Phoenix.
What Tools and Materials Are Needed to Install Attic Insulation

Before you haul anything into the attic, get your full tool and material list together. Going up and down a ladder six times because you forgot the staple gun gets old fast.
Tools required:
- Utility knife with extra blades
- Straightedge or metal T-square (for cutting batts)
- Tape measure
- Staple gun with 3/8-inch staples
- Caulk gun
- Work light or headlamp
- Plywood boards for walkways across joists
Materials required:
- Insulation (batts, rolls, or bags of loose-fill)
- Vapor barrier sheeting (if required by code in your zone)
- Expanding foam sealant (Great Stuff or equivalent)
- Fire-rated caulk for chimney and flue gaps
- Ventilation baffles (AccuVent or Durovent)
- Weatherstripping for the attic hatch
Safety gear:
- N95 respirator (not a dust mask, a real respirator)
- Safety goggles, not glasses
- Long-sleeved shirt, pants, and gloves
- Knee pads
Fiberglass gets into your skin, eyes, and lungs. Don’t skip the protective equipment. Took me one bad afternoon of itching to learn that lesson permanently.
How Much Insulation Is Needed for an Attic
Measure the attic floor’s length and width to get total square footage. Multiply length by width. That number tells you how much insulation you need in your attic.
For batt insulation, check the coverage area printed on each package. Owens Corning R-30 batts typically cover about 88.5 square feet per bundle for 16-inch on-center joists.
For blown-in cellulose, bag coverage depends on settled thickness. Greenfiber cellulose covers roughly 40 square feet per bag at R-30 depth. At R-49, that drops to about 24 square feet per bag. Check the coverage chart on every bag because it varies by manufacturer.
How to Prepare an Attic Before Installing Insulation

This step is where most people get it wrong. They rip open the insulation packages and start stuffing material between joists without doing any prep work first.
Air sealing the attic before adding insulation is the single most effective thing you can do. The Department of Energy and Energy Star both say the same thing: seal first, insulate second. Insulation slows heat transfer. But it does not stop air movement. If your attic has gaps around pipes, wires, and fixtures, warm air leaks straight through no matter how thick the insulation is.
How to Inspect the Attic for Air Leaks
Get up in the attic with a work light and look for daylight, staining, or dust marks around penetrations. Common leak spots: plumbing vent stacks, electrical wire holes, recessed light housings, the attic hatch frame, chimney chases, and gaps where interior walls meet the attic floor.
A blower door test gives you exact numbers on how much air your house leaks. But even without the test, a smoke pencil or incense stick held near suspected gaps on a windy day shows you exactly where air moves.
How to Seal Air Leaks in the Attic
Different gaps need different sealants:
- Around chimneys and flue pipes: Use metal flashing sealed with high-temperature caulk. NFPA fire codes require a minimum 2-inch clearance between combustible materials and masonry chimneys, 1-inch clearance for metal flues.
- Around plumbing stacks and electrical wires: Fill with expanding foam sealant. One can goes a long way.
- Attic hatch perimeter: Apply adhesive-backed weatherstripping to the frame and install hook-and-eye latches to pull the hatch tight against the seal.
- Recessed light housings: If they are IC-rated, insulation can touch them. If not, build a fire-safe box from drywall or sheet metal around each fixture, then seal the box to the attic floor with caulk.
- Top plates of interior walls: Seal the gap between the drywall and the framing with caulk or foam.
This is not glamorous work. It is slow, awkward, and you will be cramped in weird positions. But it is responsible for the biggest chunk of your energy savings.
How to Install Attic Ventilation Baffles
Ventilation baffles (also called rafter vents) keep a clear air channel between the soffit vents and the ridge or gable vents. Without them, insulation blocks the soffits and traps moisture in the attic.
Staple one baffle between each rafter bay where the roof meets the attic floor, right at the eave. The baffle should extend from the soffit opening up past the top of the exterior wall’s top plate. AccuVent and Durovent both make baffles that fit standard 16-inch and 24-inch rafter spacing.
If you skip this step, you risk moisture buildup, mold growth on roof sheathing, and ice dams in cold climates. Proper attic ventilation is not optional.
How to Install Fiberglass Batt Insulation in an Attic

Fiberglass batts are the most popular DIY choice for attic insulation. They come pre-cut to fit standard 16-inch and 24-inch joist spacing, they are inexpensive, and you do not need any special equipment to install them.
That said, batts are also the most commonly botched insulation type. Gaps, compression, and poor cuts reduce their actual R-value by 30% or more. Careful installation matters here.
How to Cut Fiberglass Batts to Fit Between Joists
Measure the distance between joists (not all framing is perfectly spaced). Lay the batt on a scrap piece of plywood, place a straightedge where you need the cut, and slice through with a sharp utility knife. Learning how to cut fiberglass insulation cleanly makes the difference between a tight fit and a sloppy one.
Cut batts 1/2 inch wider than the cavity for a friction fit. Do not compress them to force them in. Insulation compression reduces thickness and kills R-value.
How to Lay Fiberglass Batts Between Attic Joists
If you are using kraft-faced batts, place them with the paper side facing down toward the heated living space. That paper facing acts as a vapor barrier. In hot, humid climates (zones 1-3), some codes require the vapor barrier to face the opposite direction, so check your local International Residential Code requirements before you start.
Push each batt gently into the joist cavity until it touches the drywall ceiling below. Do not cram it. The insulation should fill the space fully without any gaps at the edges or ends. Butt each section tightly against the next piece.
When you understand how to install fiberglass insulation properly, you avoid the most common performance-killing mistakes: gaps between batts, compressed sections around wiring, and insulation that does not contact the air barrier beneath it.
How to Add a Second Layer of Fiberglass Insulation
One layer of R-30 batts often is not enough to meet current code in zones 4 through 8. Adding a second layer of unfaced fiberglass batts on top of the first layer is the fastest way to reach R-49 or R-60.
Lay the second layer perpendicular to the first. This means if your first layer runs north-south between the joists, the second layer goes east-west across the tops of the joists. Perpendicular placement covers the joists themselves and eliminates thermal bridging through the wood framing.
Only use unfaced batts for the second layer. Putting a second vapor barrier in the middle of the insulation traps moisture and causes mold. One vapor barrier, on the warm side. That is it.
How to Install Blown-In Insulation in an Attic
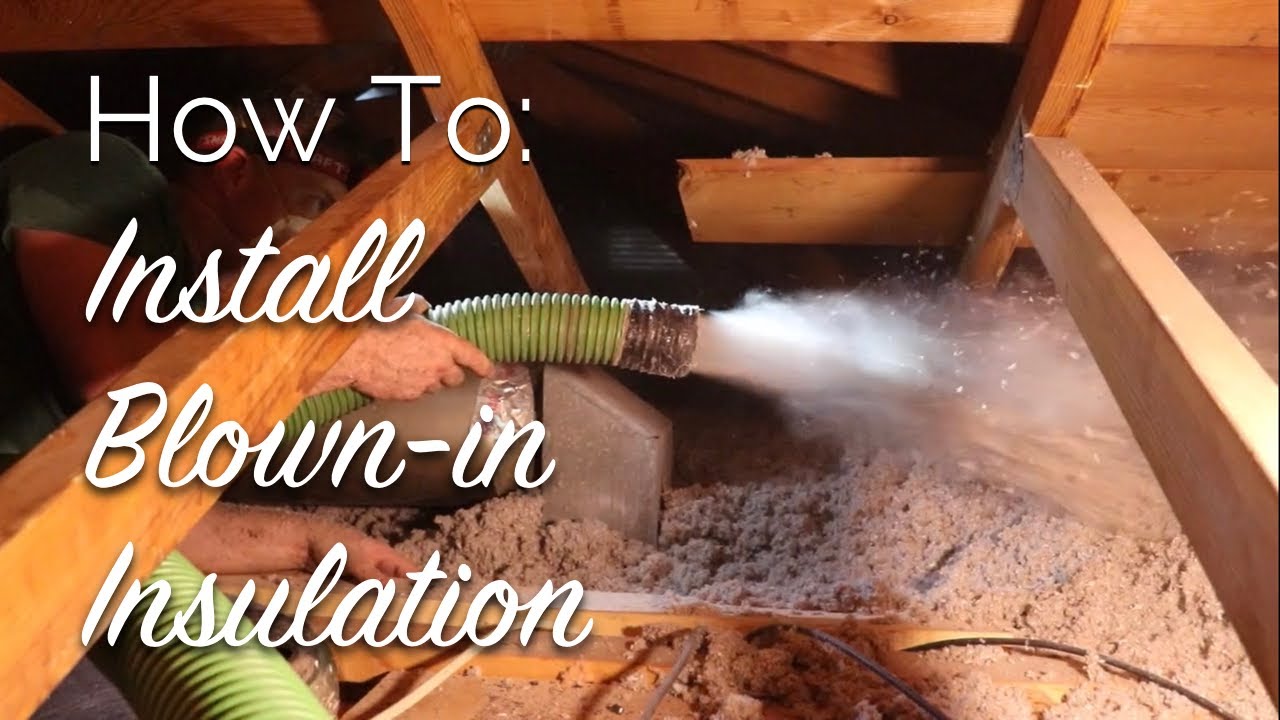
Blown-in insulation, whether loose-fill cellulose or fiberglass, fills irregular cavities, flows around obstructions, and covers the attic floor more evenly than batts. It is a strong choice if your attic has a lot of wiring, pipes, or cross-bracing that makes laying batts difficult.
The tradeoff: you need a blowing machine. But that is easier to deal with than it sounds.
What Equipment Is Required for Blown-In Insulation
Home Depot and Lowe’s both offer free blowing machine rentals when you buy a minimum number of insulation bags (usually 20 or more). The machine is an AttiCat or similar hopper-fed blower that sits outside on the ground while the hose runs up into the attic.
You will also need:
- Enough bags of cellulose or fiberglass loose-fill to hit your target R-value (check the coverage chart)
- A helper on the ground to feed bags into the machine
- Depth rulers or markers stapled to joist tops every 4 feet so you can gauge thickness as you go
- All the same safety gear listed earlier: respirator, goggles, gloves, long sleeves
Blown-in cellulose kicks up a lot of dust. More than you expect. Close the attic hatch as much as possible while you work to keep it out of the living space below.
How to Set the Blowing Machine for Attic Insulation
Follow the settings printed on the insulation bags for feed rate and air speed. Greenfiber, Owens Corning, and CertainTeed each provide specific machine settings for their products.
Too much air and not enough material creates fluffy, low-density fill that settles fast. Too little air clogs the hose. Insulation settlement is a real issue with blown-in products. Cellulose can lose 10% to 20% of its initial height within the first year, so you should overfill slightly to account for this.
How to Blow Insulation into Attic Joist Cavities
Start at the point farthest from the attic access hatch. Work backward toward the hatch so you are not crawling over freshly blown material.
Hold the hose about 3 to 4 feet from the area you are filling. Sweep it back and forth in a steady motion, building up insulation evenly across the joist bays. Watch the depth rulers as you go.
Target the settled depth for your desired R-value, not the initial fluffy depth. For cellulose at R-49, the initial blown depth is roughly 15.5 inches, which settles to about 13.2 inches over time. Johns Manville and Greenfiber both publish settled vs. initial thickness charts on their packaging.
Do not blow insulation over the ventilation baffles you installed earlier. Keep the soffits clear. And do not pile insulation against the attic hatch itself. You still need to get out.
FAQ on How To Install Insulation In Attic
What is the best type of insulation for an attic?
It depends on your situation. Blanket insulation (fiberglass batts) works well for open joist bays with few obstructions. Blown-in cellulose fills irregular spaces better. For maximum air sealing and R-value per inch, open cell vs closed cell spray foam is worth comparing.
Can I install attic insulation myself?
Fiberglass batts and blown-in cellulose are both DIY-friendly projects. Spray foam requires professional spray rig equipment and training. For batts and loose-fill, a helper, basic tools, and proper safety gear are all you need.
How much does it cost to insulate an attic?
The cost per square foot for insulation ranges from $0.30 for fiberglass batts to $5.00 for closed-cell spray foam. A 1,000-square-foot attic with blown-in cellulose typically runs $1,000 to $1,500 for materials alone.
Should I remove old insulation before adding new?
Not always. If existing insulation is dry, mold-free, and not compressed, you can add new material on top. If it contains vermiculite (possible asbestos risk) or shows rodent damage, removing the old attic insulation first is the right call.
Do I need a vapor barrier when insulating an attic?
In cold climates (zones 5 through 8), a vapor barrier on the warm side of the insulation prevents moisture from condensing inside the material. In hot, humid climates, it goes on the opposite side. Understanding what a vapor barrier does helps you place it correctly.
How do I know if my attic needs more insulation?
If you can see the tops of your attic floor joists, you do not have enough. A home energy audit gives you exact numbers. High energy bills, ice dams, and uneven room temperatures are also clear signs.
How long does attic insulation last?
Fiberglass batts last 80 to 100 years if kept dry and uncompressed. Cellulose lasts 20 to 30 years before settling reduces its R-value significantly. Knowing how long attic insulation lasts by type helps you plan maintenance and replacement cycles.
Is it safe to insulate around electrical wiring?
Yes, with modern NEC-compliant wiring. Split batts around wires so insulation contacts the air barrier below without bunching. For recessed lights, only IC-rated fixtures can touch insulation directly. Non-IC-rated fixtures need a fire-safe clearance box around them.
Can I insulate my attic in summer?
You can, but attics reach 130 to 150 degrees F in summer. OSHA heat safety guidelines apply. Work early in the morning, take frequent breaks, bring water, and stop immediately if you feel dizzy. Fall and spring are far more comfortable.
Will insulating my attic qualify for a tax credit?
The Inflation Reduction Act provides an insulation tax credit of up to 30% of material and installation costs, capped at $1,200 per year for insulation upgrades. Check with the IRS or an Energy Star insulation qualified contractor for current eligibility.
Conclusion
Knowing how to install insulation in attic spaces puts you in control of your home’s energy performance. Seal the air leaks first, pick the right material for your climate zone, and hit the target R-value. That sequence matters more than most people realize.
Whether you go with fiberglass batts between joists or rent a blowing machine for loose-fill cellulose, proper technique beats expensive materials every time. No gaps. No compression. No blocked soffit vents.
Check your work with a thermal imaging camera after installation. Cold spots show up immediately.
The ROI on insulation is hard to beat. Lower utility bills, better comfort year-round, and a payback period for insulation that typically falls between 2 and 4 years. Few home insulation upgrades deliver returns that fast.
Take your time with this project. Do it once, do it right, and your attic will perform for decades.


